In InvoiceQuick, you can easily modify the issued and due dates for your invoices. Follow this step-by-step guide to learn how:
- Go to the Invoices Section:
- Log in to your InvoiceQuick account and access the dashboard.
- Click on the "Invoices" tab located in the navigation menu.

Create an Invoice (if needed):
- If you haven't created any invoices yet, click on the following link to learn how to make one: How to Create an Invoice.

-
Once you have an existing invoice or if you have just created one, proceed to the next step.
Edit Issued and Due Dates (Method 1):
- Find the invoice for which you wish to change the dates from the list of invoices on the Invoices page.

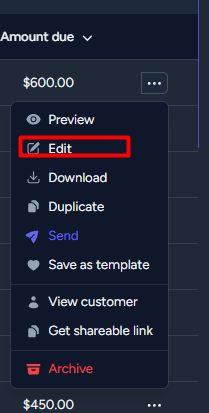
- Look for three vertical dots (ellipsis) next to the invoice and click on them to reveal a dropdown menu.

- Select "Edit" from the dropdown menu. This will take you to the invoice details page.

Edit Issued and Due Dates (Method 2):
- Alternatively, you can directly access the invoice you want to edit by clicking on anywhere but the customer or preview from the list of invoices on the Invoices page.

- On the invoice details page, you will find an "Edit" button. Click on it to make changes to the invoice.

- Modify the Dates:
- Once you are in the invoice editing mode, you will see the current issued and due dates displayed.

- To change the issued date, click on the current date field, and a date picker will appear. Select the new date from the calendar.
 s
s
-
To change the due date, similarly click on the current date field, and choose the desired due date from the date picker.

Save Changes:
- After adjusting the issued and due dates, review other details if needed.
- Once you are satisfied with the changes, click the "Save" button to save the modified dates and any other modifications you made to the invoice or "Preview and send" if you need to send it with the corrected dates.

By following these steps, you can effortlessly change the issued and due dates for your invoices in InvoiceQuick, ensuring accuracy and timeliness in your billing process.
